
A bespoke servery counter is the functional centrepiece of your hospitality space, but a single measurement error can turn a high-end investment into a costly site modification. It’s natural to feel a sense of trepidation when commissioning custom equipment, especially when you’re balancing the needs of your customers against the technical constraints of your building. Learning exactly how to measure for a new servery counter involves more than just pulling a tape measure across a room. It requires a methodical mapping of the three-dimensional “utility envelope” of your specific environment.
We understand that the stakes are high, as overlooking a floor drain or a power point can halt an installation in its tracks and lead to expensive delays. This guide provides the technical clarity you need to master the measurement process, giving you the confidence that your new unit will fit perfectly and function flawlessly from day one. We’ll walk you through the essential steps to create a professional dimension list, covering everything from ergonomic display depths to the vital clearance required for staff movement and utility connections.
Key Takeaways
- Identify the professional surveying tools required to achieve laser-accurate dimensions across large commercial dining environments.
- Master the technical process of how to measure for a new servery counter by balancing total available wall length with optimal ergonomic depths.
- Map the “invisible” utility infrastructure, including 13-amp and 32-amp power points, to ensure your bespoke unit integrates seamlessly with existing services.
- Calculate precise clearance for both staff operational zones and customer queueing areas to guarantee a smooth, efficient service flow.
- Understand how professional CAD modelling eliminates the risk of costly installation errors by creating a precise “digital twin” of your space.
Essential Preparation: The Professional Servery Measuring Toolkit
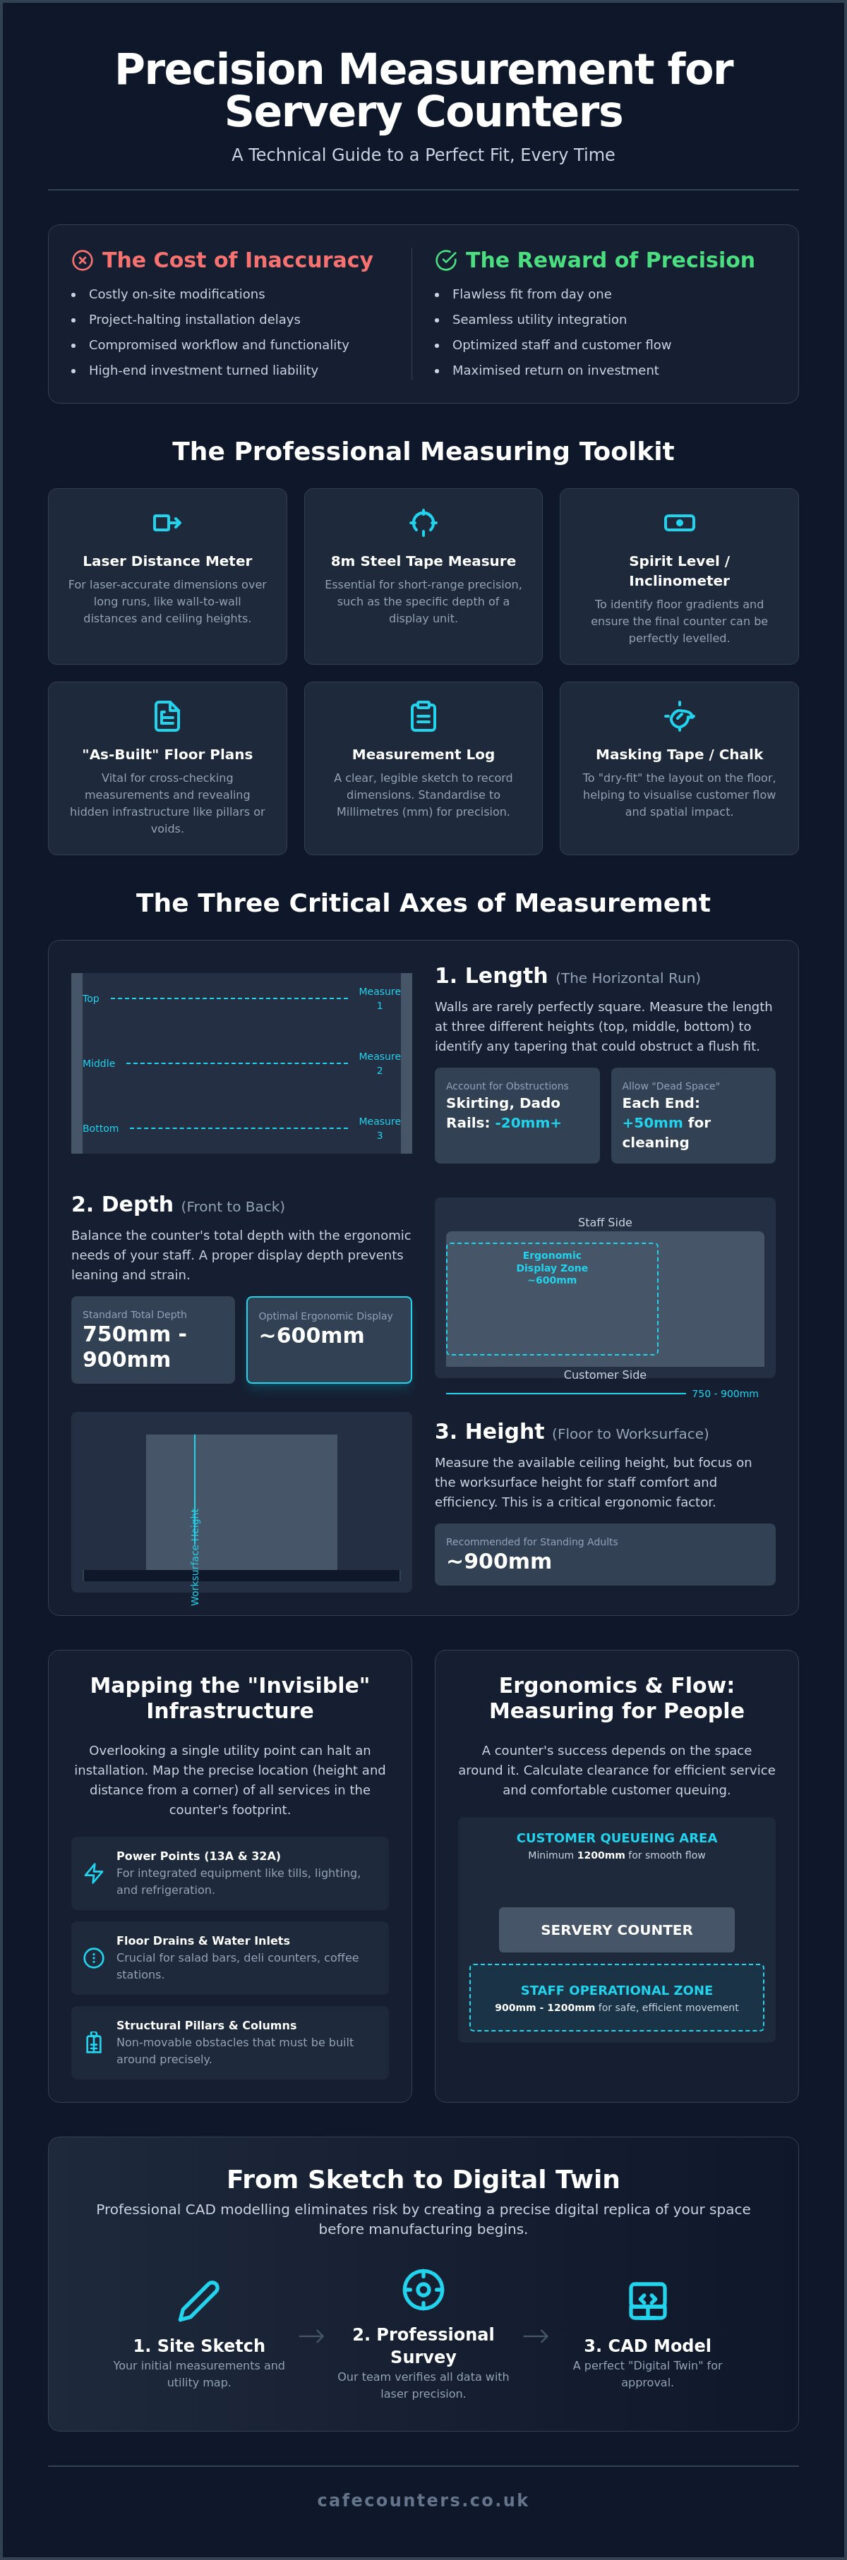
Precision is the hallmark of a successful commercial installation. When you’re determining how to measure for a new servery counter, you aren’t just looking for a rough footprint; you’re creating a technical blueprint that our manufacturing team will use to fabricate a high-value asset. A standard tape measure is a useful starting point, but relying on it alone for long distances often leads to “tape sag.” This minor physical dip can introduce errors of 10mm or more over a five-metre run, which is enough to prevent a bespoke unit from fitting into its designated alcove.
In large dining halls or environments designed for Cafeteria-style service, a laser distance meter is indispensable. It establishes long-run accuracy and allows you to capture ceiling heights and wall-to-wall distances with a single button press. Equally critical is the use of a spirit level or digital inclinometer. Most commercial floors aren’t perfectly flat. Identifying a gradient early ensures that your counter can be designed with adjustable feet or plinths to remain level. This protects the structural integrity of the unit and ensures the efficient drainage of integrated equipment like salad bars or deli counters.
Before you pick up a tool, secure a copy of your existing floor plan or “as-built” drawings. These documents reveal what’s behind the surface, such as structural pillars or recessed service voids that might not be immediately obvious. Comparing your physical measurements against these professional plans acts as a vital cross-check, ensuring that your vision aligns with the reality of the building’s architecture.
The “Must-Have” Tools for Accuracy
Professional surveys require a specific kit to guarantee results. Use a high-quality 8m steel tape for short-range precision, such as measuring the specific depth of a patisserie display. Complement this with a laser distance meter for total room lengths and heights. Finally, keep a roll of masking tape or a stick of chalk handy. Physically marking the footprint on the floor allows you to “dry-fit” the layout. It’s a simple step that helps you visualise the impact on customer flow before any metal is cut in our workshop.
Setting Up Your Measurement Log
Clarity in documentation prevents manufacturing delays. Start by drawing a rough bird’s-eye view sketch of the space. It doesn’t need to be a work of art, but it must be legible. Standardise your units immediately; in the UK commercial kitchen industry, we work exclusively in millimetres to ensure total precision. Record “overall” dimensions for the total room and “internal” clearance dimensions for the specific area where the equipment will sit. This distinction is vital when fitting units between two fixed walls, as you must account for the thickness of wall tiles or future cladding that might reduce the available gap.
Step-by-Step: Taking the Core Dimensions for Your Counter
Once your toolkit is prepared, the physical process of documenting the site begins. Understanding how to measure for a new servery counter requires a focus on three critical axes: length, width, and height. You aren’t just measuring a piece of furniture; you’re measuring the interface between your building’s architecture and your operational workflow. Walls are rarely perfectly vertical or square; therefore, you must measure the length at three different heights to identify any tapering that could obstruct a flush fit. If your design includes an L-shaped configuration or a “return” section, you must measure both the internal and external angles to ensure the mitred joints align perfectly during installation.
The Three Critical Axes: Length, Width, and Height
When recording the total available length, always account for skirting boards, wall coving, or protruding dado rails. These small architectural details can reduce your usable space by 20mm or more. For standalone units, ensure you have at least 50mm of “dead space” at either end to allow for easy cleaning and maintenance. While British standards are primary, many high-end UK manufacturers align their spacing and sanitation clearances with international best practices, such as the FDA Food Code requirements, to ensure global hygiene compliance.
- Depth: Standard counter depths typically range from 750mm to 900mm. Research suggests a display depth of 600mm is ergonomically favourable, as it reduces the need for staff to lean too far forward.
- Height: For adult standing work, the recommended worksurface height should not exceed 90cm. For primary school environments, this height is typically reduced to 650mm or 750mm to ensure younger children can see the food and interact safely with the tray slide; for those seeking specialized equipment for these settings, learn more about Kigata offers a range of tailored solutions for schools and daycares.
- Returns: For L-shaped counters, measure the length of each “arm” from the corner point to the end, then provide the total outer perimeter.
Measuring for Integrated Equipment
Bespoke counters often house sophisticated technology that requires precise cut-outs. If your layout includes drop-in refrigerated display units, you must provide the exact manufacturer-specified aperture dimensions rather than the overall unit size. This ensures the flange sits flush on the worktop. Ventilation is equally vital; always leave a 50mm “breathing room” gap around the compressors of patisserie displays to prevent overheating and maintain energy efficiency. When planning your layout, our team can help you select the ideal bespoke serving counters to fit your specific dimensions.
Finally, consider the vertical clearance for glass tops. If you’re installing a deli counter with a curved glass sneeze guard, verify that it doesn’t obstruct overhead heated gantries or existing lighting fixtures. Taking these measurements accurately during the design phase prevents costly site modifications and ensures a seamless installation that looks as if it were built into the fabric of the building.
Mapping the Invisible: Utilities and Structural Infrastructure
Measuring the visible footprint is only half the battle. To truly understand how to measure for a new servery counter, you must map the hidden infrastructure that powers your daily operation. A beautiful counter is functionally useless if it arrives on site only to find a 32-amp power outlet is blocked or a floor drain is out of alignment. We treat these “invisible” factors with the same technical precision as the counter’s physical length, as they dictate the long-term reliability of your equipment. Even a minor 5mm slope across a three-metre run can cause significant issues during the installation of a bespoke serving counter. If a floor isn’t perfectly level, sliding doors may stick, and the vital drainage systems for refrigerated units will fail to clear waste water effectively.
Electrical and Plumbing Points
Start by identifying every utility point within the proposed footprint. It’s not enough to know a socket exists; you must measure the distance from the floor to the centre of the socket and its exact position along the wall. Differentiate clearly between standard 13-amp sockets and heavy-duty 32-amp supplies required for items like heated gantries. For plumbing, map the water inlet and waste pipe positions for coffee machines or soup stations. Identify “dead zones” where plumbing cannot easily be moved, such as structural floor slabs. Always ensure that your measurements allow for access panels. These are vital for the future maintenance of refrigerated components and prevent the need to dismantle the entire counter for a simple repair.
Structural Obstacles and HVAC
Structural pillars and wall protrusions are common in UK commercial buildings, particularly in renovated heritage spaces. When measuring around a support column, you must capture its depth and width with absolute accuracy to ensure the counter cladding wraps around it without losing continuity. This level of detail prevents unsightly gaps and maintains a professional, high-end finish. Look upwards as well. Check for overhead extraction hoods or low-hanging lighting that might interfere with the installation of Vision Heated Counters or other tall display equipment. Finally, account for existing radiators and ventilation grilles. If a counter blocks a radiator without a planned vent in the plinth, you risk heat buildup that can damage both the counter’s internal structure and any nearby refrigeration units.
By documenting these structural and utility constraints during your initial survey, you provide our designers with the information needed to build “around” the building’s quirks. This proactive approach eliminates the need for aggressive site modifications during the final installation phase.
Ergonomics and Flow: Measuring for Human Interaction
Measuring the physical space provides the technical foundation, but measuring for human movement determines the operational success of the installation. When you evaluate how to measure for a new servery counter, you must look beyond the stainless steel and map the “Staff Zone” and “Customer Zone” with equal precision. A counter that fits perfectly into a room but leaves no space for a staff member to open a refrigerated drawer is a failure of design. Efficiency isn’t simply about how fast a machine operates; it’s about how effortlessly your team can move within their environment to provide seamless service.
The Golden Rules of Clearance
The area behind the counter, often referred to as the “Staff Zone,” requires a minimum clearance to remain functional during peak hours. We recommend a “work zone” width of 1200mm. This specific dimension allows two staff members to pass each other comfortably without disrupting the workflow. When you’re calculating the total footprint of your unit, don’t forget to account for tray slides. These typically add an extra 300mm to the width of the counter on the customer side. You must also ensure that all swing-doors and refrigerated drawers have their full range of motion. Measure the depth of the drawer when fully extended and add a 500mm “standing gap” to ensure the operator isn’t pinned against a back-wall unit while accessing stock.
If you’re unsure how these ergonomic factors impact your layout, our team can help you design bespoke serving counters that prioritise both staff efficiency and customer comfort.
Accessibility and Inclusivity
Inclusive design is a legal and moral necessity in modern UK hospitality. Your measurements must reflect DDA (Disability Discrimination Act) compliance to ensure the space is accessible to every user. This involves more than just a wide aisle; it requires specific height adjustments. While a standard adult counter sits at 900mm, you should plan for lower-level service sections, typically between 750mm and 800mm high, particularly at till points or cutlery stations. This allows for comfortable interaction for wheelchair users and younger children.
- Turning Circles: Provide a clear 1500mm turning circle within the queueing area to allow for easy navigation.
- Knee Clearance: Ensure at least 700mm of vertical knee clearance at any point where a customer might need to sit or pull up closely to the counter.
- Access Routes: Verify that delivery access routes and fire exit paths remain at a minimum width of 1200mm after the counter is installed.
By integrating these “human” dimensions into your initial survey, you move from simply buying a piece of equipment to creating a high-performance workspace. This methodical approach ensures that your final layout is as ergonomic as it is aesthetically striking, preventing the bottlenecks that often plague poorly planned servery environments.
From Sketch to CAD: Why a Professional Site Survey is Essential
While the steps outlined in this guide empower you with the knowledge of how to measure for a new servery counter, the final bridge between a conceptual sketch and a physical installation is professional CAD modelling. A 10mm discrepancy might seem negligible on a hand-drawn plan. However, when that sketch is translated into high-grade stainless steel in our manufacturing facility, that same 10mm can prevent a unit from sliding into an alcove or leave an unsightly gap that traps debris. We view your initial measurements as a vital starting point that allows us to provide an accurate initial quote, but we always recommend a professional survey to lock in the technical details before production begins.
Our process relies on turning your site data into a “digital twin” of the proposed environment. This methodical approach allows us to identify potential risks that are often invisible to the untrained eye, such as slight wall bows or ceiling height variances that could interfere with overhead gantries. By moving from a 2D drawing to a 3D model, we ensure that every component is engineered to fit the unique geometry of your building. This precision is what allows us to maintain our reputation for reliability and artisanal quality across the UK.
The Power of CAD Modelling
Computer-Aided Design (CAD) is more than a visual aid; it’s a diagnostic tool. We use these models to simulate customer flow and staff movement, identifying potential bottlenecks before they manifest in your dining hall. This stage is critical for ensuring that every patisserie display or salad bar fits its designated housing with millimetre precision. It also allows us to verify that ventilation paths for refrigerated units are unobstructed, protecting your long-term operational efficiency and energy costs.
Booking a Professional UK Site Survey
When a TFSE Products Ltd engineer visits your location, they bring a level of expertise honed through decades of experience in diverse commercial environments. Our national site survey service provides the final layer of security for your project. We don’t just check the numbers; we provide expert advice on materials and finishes that will withstand the rigours of your specific sector. This collaborative visit is the moment where we “guarantee the fit” of your bespoke unit.
Once the survey is complete and the CAD drawings are approved, the project moves into our internal production facility. Because we manage the journey from the first measurement to the final commissioning of the equipment, you can move forward with total confidence. You aren’t just buying a counter; you’re partnering with a team that values precision and durability as much as you do, ensuring your new servery functions flawlessly from the moment it’s installed.
Securing Precision for Your Commercial Vision
Mastering the technical details of your space is the essential first step in any successful hospitality project. By understanding how to measure for a new servery counter, you establish a foundation that accounts for structural constraints, utility locations, and the vital ergonomics of daily service. This level of preparation ensures that your investment provides long-term operational efficiency and a superior experience for both your staff and customers. It moves the project from a simple equipment purchase to a strategic workspace upgrade.
Beyond the functional layout of your servery, ensuring your venue is ready for high-end celebrations is a key part of modern hospitality; to explore professional production services for your events, visit RCT Entertainment & Events.
While your initial survey provides the roadmap, our team of experts is here to provide the final technical assurance. We offer British-made quality directly from our own UK manufacturing facility, supported by advanced CAD modelling included in our bespoke design process. To ensure a flawless result, we provide a comprehensive installation and commissioning service nationwide, taking your project from a conceptual sketch to a fully functional physical space.
Book your professional UK site survey and CAD consultation today to lock in the precision your business deserves. We look forward to helping you bring your unique vision to life with total confidence and artisanal pride.
Frequently Asked Questions
What is the standard height for a commercial servery counter in the UK?
The standard height for an adult commercial servery counter in the UK is 900mm. This dimension provides an ergonomic standing position for staff and maintains clear visibility for customers. In primary school environments, we typically reduce this height to 650mm or 750mm to ensure younger children can interact safely with the service line and tray slides.
How much space should I leave behind the counter for my staff?
You should ideally leave 1200mm of clear space behind the counter to create an efficient and safe “work zone.” This width allows two staff members to pass each other comfortably during peak service periods without disrupting the operational flow. If your floor space is restricted, 900mm is the absolute minimum required to allow for the full extension of refrigerated drawers and cupboard doors.
Do I need to measure for plumbing if I only have a dry counter?
Yes, you must document the location of all existing plumbing points even for a dry counter installation. Mapping these utilities ensures that your new unit doesn’t block access to essential stopcocks or floor drains required for building maintenance. It also simplifies future upgrades should you decide to integrate water-dependent equipment like coffee machines or soup stations at a later date.
What is the difference between a site survey and a basic measurement?
A basic measurement provides a rough footprint used for initial quoting, whereas a professional site survey is a high-precision technical audit. During a survey, our engineers use laser technology and CAD modelling to identify structural wall bows, floor gradients, and utility constraints. This detailed process is a critical part of how to measure for a new servery counter to ensure a guaranteed fit during installation.
How do I measure for a counter that needs to fit between two walls?
You must take three separate width measurements at the floor level, the midpoint, and the top of the wall. Walls are rarely perfectly square, so identifying the narrowest point is vital to prevent the counter from becoming wedged during installation. We generally recommend subtracting a clearance tolerance of 10mm to 20mm from your smallest measurement to ensure the unit slides into place without damaging the wall finishes.
Can I use my old counter measurements for a new bespoke unit?
You should never rely on old measurements when commissioning a new bespoke unit. Modern catering equipment often features different ventilation requirements, internal footprints, and utility connection points compared to legacy models. Conducting a fresh survey ensures that your new counter is designed to meet current food safety regulations and integrates seamlessly with your existing building infrastructure.
What units should I use when sending measurements to a manufacturer?
Always use millimetres (mm) when providing dimensions to a UK manufacturer. This is the universal industry standard for commercial fabrication and ensures the highest level of precision during the CAD modelling phase. Using centimetres or inches introduces the risk of conversion errors, which can lead to costly manufacturing mistakes and installation delays.
How do I account for uneven floors when measuring for a long counter?
Identify the highest point of the floor across the entire counter run using a laser level or a digital inclinometer. This high point serves as the datum for your total counter height. Part of how to measure for a new servery counter involves documenting these floor variances so the unit can be manufactured with adjustable feet or bespoke plinths, ensuring the final worktop is perfectly level for service.